
 12617
12617
The Z-Box Hub App is a companion to the system. You can use it to check in on your home remotely, monitor, and control devices. Take a look below to learn more about the functionality of the mobile app and where to download it from. Scroll down for new hub set-up using your mobile device.
We recommend setting up your Z-Box Hub from the computer browser. The WEB UI (computer browser view) is the command center for your hub - this is where you'll add, edit, and remove devices, as well as program automations and create scenes.
NOTE: If you already set up and registered your hub from the WEB UI (computer browser):
- When you first open the app, simply click the SIGN IN button.
- Click on SIGN IN OFFLINE under the blue button.
- Use the same credentials as you created during the first set-up in the web browser to sign in.
- Use the Sign In blue button for remote access only.
- Do NOT choose ADD HUB if you've already configured your hub in the WEB UI.
If you decide to proceed with the set-up using your mobile device, please follow the steps below.
Android: What You'll Need
- Physical access to your Z-Box hub to access the serial number and other important information on the back label.
- Working Internet router with a local Wi-Fi network set-up.
- Smartphone or tablet connected to your local W-Fi network.
- Password to your Wi-Fi network.
How to Set up Z-Box on Android Mobile App
1. Plug in your Z-Box Hub into a standard 120 V receptacle / outlet using the included USB cable and power supply.
- Note: If you’re using your own USB, make sure it isn’t longer than 10 feet for best results.
2. Wait for the hub to power up.
- The LED indicator on your hub will turn solid white and it will then start pulsing blue.
- Once the LED turns solid red the hub is ready to be configured.
3. Download your Z-Box Hub app:
- Click here to download the Android app from the Google Play Store
4. Click the blue Install button.
5. Once the install completes, click Open.
6. Click Allow notifications.

7. Click New Installation.
8. Click Scan QR Code.
9. You will need to enable permissions in order to use the camera. Click While using the app.

10. Scan the QR code on the label on the bottom of the Z-Box.
11. Click Precise for the location, and allow access to the device's location While using the app.
12. The app will connect to the hub. Please be patient, this may take a few minutes.

13. Click Connect to use the temporary Wi-Fi to connect the Z-Box.
14. The hub will be found; verify the hub ID (ZB-0000xxxxx). Click Continue with this hub.
15. Click Owner.

16. Select Connect to Wi-Fi.
17. Choose your local Wi-Fi network.
18. Enter your password for your local Wi-Fi network.

19. Wait while the network connections are checked.
20. You will be directed to open the Wi-Fi settings on your mobile device to connect to your home Wi-Fi network.
21. Open your Wi-Fi Settings.

22. Select Wi-Fi to choose your network.
23. Select your home Wi-Fi network.
24. You will be taken to the Remote Access screen. We highly recommend setting up remote access at this time; this allows you to control your devices and access your hub from any location outside of your home Wi-Fi network. Click Continue to set up remote access.

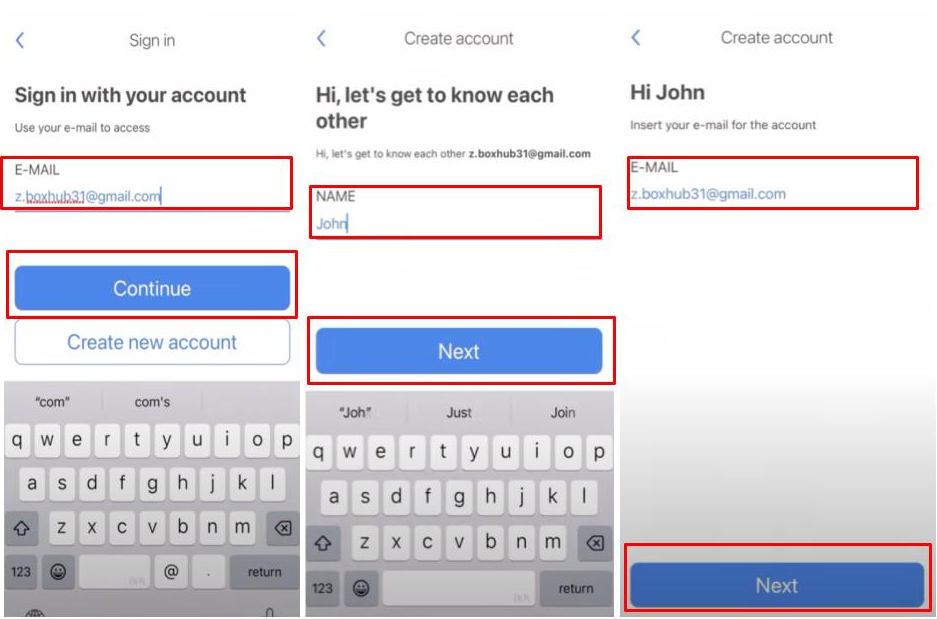
25. Enter your e-mail address. Click Create New Account.
26. Enter your name. Click Next.
27. Enter your email address for the account. Click Next.

28. Create your password; enter the same password to confirm. Click Next.
29. Click on the hyperlinked Privacy Policy and Terms of Service. Toggle the slider. Click Accept.
30. Accept or decline e-mail and phone agreements.

31. Your account has been created; you have been sent a confirmation email to the email address you used for remote access.
32. Navigate to your email inbox. Open the message from Cloud Registration.
33. Click on the link to confirm your email address.

34. Enter your email and password from steps 27/28. Click LOG IN.
35. Now you will need to connect your hub to your remote access account. Click More.
36. Enter the Serial Number and Mac Address from the label on the bottom of your Z-Box hub.

37. The hub will be added to your remote access account. Please wait and do not exit the screen.
38. You will receive a message when the hub has successfully been added to your remote access account. Click OK.
39. Your hub has successfully been added to remote access.

40. Navigate back to the Congratulations screen from step 31.
41. Type in your email address from Step 27. Click Continue.
42. Type in your password from Step 28. Click Login.

43. You are now logged in. Click Continue to use this email for remote access on the Z-Box.
44. Click Set Position so your hub can run location based scenes (1 mile from home and the lights start turning on).
45. Set your location and click Next.

46. Click Complete; your hub will reboot.
47. Wait while the hub reboots; DO NOT exit this screen.
48. The guide will pop up when rebooting is complete. You can swipe through the guide or click Skip in the upper right had corner.

49. You can click See What's New to view updates made to the Z-Box.
50. If there are software updates available, you will have the option to View Changelog, Skip, or Download. You can always apply the update at a later date. If you choose to update, we have a guide here.
51. You are logged in via Remote Access!

iOS: What You'll Need
- Physical access to your Z-Box hub to access the serial number and other important information on the back label.
- Working Internet router with a local Wi-Fi network set-up.
- Smartphone or tablet connected to your local W-Fi network.
- Password to your Wi-Fi network.
How to Set up Z-Box on iOS Mobile App
1. Plug in your Z-Box Hub into a standard 120 V receptacle / outlet using the included USB cable and power supply.
- Note: If you’re using your own USB, make sure it isn’t longer than 10 feet for best results.
2. Wait for the hub to power up.
- The LED indicator on your hub will turn solid white and it will then start pulsing blue.
- Once the LED turns solid red the hub is ready to be configured.
3. Download your Z-Box Hub app:
- Click here to download the iOS app from the App Store
4. Once the app is downloaded, click Open.
5. Click Allow to permit the Z-Box to find devices on your local network.
6. Select your preferred option regarding tracking activity.

7. On the How do you want to start? screen, click New Installation.
8. Click Scan QR Code for the easiest installation.
9. Click Allow to permit the app to use the camera for the QR code scanning.

10. Scan the QR code located on the back of your Z-Box hub.
11. The app will connect to the Z-Box. Please wait and DO NOT exit the app.
12. Click Join.

13. Connecting. DO NOT exit the app.
14. Hub found; click Continue with this hub.
15. Select Owner if you are setting up your own hub.

16. Navigate to your phone's Wi-Fi settings to connect to your local Wi-Fi network.
17. Select your local Wi-Fi network.
18. We strongly recommend setting up Remote Access now. Click Continue.

19. Enter your email address. Click Continue.
20. Enter your name. Click Next.
21. Enter your email address again. Click Next.
22. Create your password; enter the same password to confirm. Click Next.
23. Click on the hyperlinked Privacy Policy and Terms of Service. Toggle the slider. Click Accept.
24. Accept or decline e-mail and phone agreements.

25. Your account has been created; you have been sent a confirmation email to the email address you used for remote access.
26. Navigate to your email inbox. Open the message from Cloud Registration.
27. Click on the link to confirm your email address.
28. Enter your email and password from steps 19/20. Click LOG IN.
29. Now you will need to connect your hub to your remote access account. Click More.
30. Enter the Serial Number and Mac Address from the label on the bottom of your Z-Box hub.
31. The hub will be added to your remote access account. Please wait and do not exit the screen.
32. You will receive a message when the hub has successfully been added to your remote access account. Click OK.
33. Your hub has successfully been added to remote access.
34. Navigate back to the Congratulations screen from step 27.
35. Type in your email address from Step 19. Click Continue.
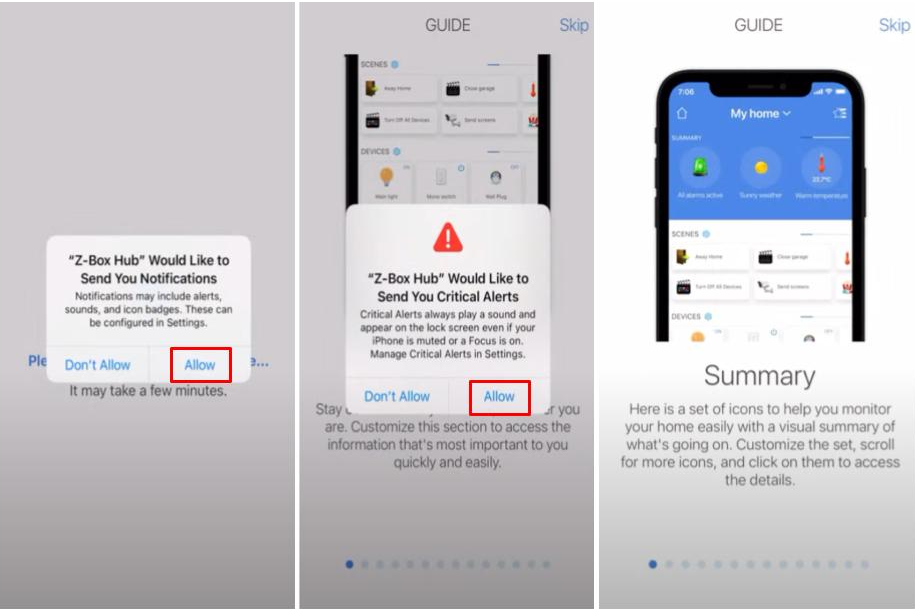
36. Type in your password from Step 20. Click Login.
37. Click Allow to receive notifications.
38. Click Allow to receive Critical Alerts.
39. You can either swipe through for a quick tutorial on the Guide, or click Skip in the upper right hand corner.
40. You can click See What's New to view updates made to the Z-Box.
41. If there are software updates available, you will have the option to View Changelog, Skip, or Download. You can always apply the update at a later date. If you choose to update, we have a guide here.
42. You are logged in via Remote Access
!
What Can I Do From the Mobile App?
-
Set-up your brand new hub following the prompts on the screen
-
Add new devices to your hub
-
Monitor your devices and control them if needed
-
Activate preset scenes and scenarios
-
Arm and disarm your alarms
-
Organize the Favorites screen
-
Click here to learn how to organize the Favorites screen on your app.
-
What Needs to be Done via Web UI
-
Add new rooms or sections for your smart home
-
Create new alarm zones or notifications
-
Add or remove users
-
Access advanced settings for the hub or your devices
-
Update firmware for your hub or end devices
Important Login Information for the WEB UI
LOCAL ACCESS:
- HUB SERIAL NUMBER LOGIN:
- Type in http://zb-00000000.local/ in the URL address bar
- “zb-00000000” stands for your hub’s 8-digit serial number printed on the label on the bottom of the hub
- Type in http://zb-00000000.local/ in the URL address bar
- IP ADDRESS LOGIN:
- Type in your Z-Box Hub's IP Address (00.0.000.000) in the URL address bar
- 00.0.000.000 stands for your hub's 9-digit IP Address.
- You can check the IP address that was assigned for your hub under:
- Settings (gear icon in bottom left corner) > Network > Wi-Fi Connection (the right column) > IP address (second line) > We recommend changing the Network connection type to Static IP.
- You can check the IP address that was assigned for your hub under:
- 00.0.000.000 stands for your hub's 9-digit IP Address.
- Type in your Z-Box Hub's IP Address (00.0.000.000) in the URL address bar
REMOTE ACCESS:
- Copy and paste https://remote-zbox.myhubid.com/ in the URL address bar for remote access outside of your home network.
We recommend saving the above login methods via local IP of your Z-Box hub, the hub serial number login link, and the remote access link in your internet browser's bookmarks for easy login access on your computer.
Z-BOX HUB APP
NOTE: If you already set up and registered your hub from the WEB UI (computer browser):
- When you first open the app, simply click the SIGN IN button.
- Click on SIGN IN OFFLINE under the blue button.
- Use the same credentials as you created during the first set-up in the web browser to sign in.
- Use the Sign In blue button for remote access only.
- Do NOT choose ADD HUB if you've already configured your hub in the WEB UI.


